

Wir haben uns in den ersten beiden Teilen unseres kleinen Rundumschlages zum Thema Dbvisit Standby Multiplatform v11 bereits grundsätzlichen Themen als auch dem Einsatz von Dbvisit für SQL Server gewidmet.
Nun kommen wir im dritten und (vorerst) letzten Teil zur Betrachtung von MP v11 für das Management von Oracle Standby Datenbanken. Spoileralarm: auch hier fällt das Fazit wieder sehr positiv aus.
Der erste wesentliche Unterschied zu früheren Versionen fällt bereits bei der Installation auf. Während die Vorversionen mit einem Tarball der einzelnen Produktkomponenten plus Installer ausgeliefert wurden, finden wir in v11 nur noch zwei Binaries, den Installer für das Controlcenter und den Installer für den Agent. Letzterer ersetzt die bisher selektiv installierbaren Komponenten Dbvagent, Dbvnet und Standby.
[oracle@c-tso-autoupgrade-01.test.aspicon.lan]$ unzip -q dbvisit-standbymp11.0.0-linux.zip
[oracle@c-tso-autoupgrade-01.test.aspicon.lan]$ ls dbvisit-standbymp11.0.0-linux
install-agent-v11.0.0 install-control-v11.0.0
Die nächsten grundlegenden Neuerungen fallen bei der Installation des Agents auf. Es ist nun nicht mehr möglich, die Installation auf einzelne Komponenten einzuschränken, zum Beispiel, weil man keine GUI betreiben oder statt des dbvnet für den Filetransfer die etablierte openssh-Suite nutzen möchte. Die Installation des Agents an sich ist straight-forward und selbsterklärend.
Achte darauf, dir die vergebene Passphrase gut zu notieren. Es muss für alle Agents und das Controlcenter die gleiche Passphrase verwendet werden, da darüber die Autorisierung erfolgt.
[oracle@c-tso-autoupgrade-01.test.aspicon.lan]$ ./install-agent-v11.0.0
+----------------------------------------------------------------------+
|      ____   _                  _ _           __  __ ____             |
|     / ___| | |_ __ _ _ __   __| | |__  _   _|  \/  |  _ \            |
|     \___ \ | __/ _' | '_ \ / _' | '_ \| | | | |\/| | |_) |           |
|       ___) | || (_| | | | | (_| | |_) | |_| | |  | | __ /            |
|     |____/  \__\__,_|_| |_|\__,_|_.__/ \__, |_|  |_|_|               |
|      Copyright 2022                    |___/    By Dbvisit           |
+----------------------------------------------------------------------+

Welcome to Dbvisit StandbyMP setup version v11.0.0.

? Please carefully read the end-user license agreement at https://dbvisit.com/eula. Do you agree to the terms of this agreement? Yes
? Which directory should the software be installed into? /usr/local/dbvisit

- - - You are now configuring the Dbvisit StandbyMP Agent - - -

The Agent will listen on the following discovered addresses:
- 127.0.0.1
- 192.168.137.171
- 192.168.137.108
- 192.168.137.110
- 10.200.200.1
- 169.254.20.88
? Agent File Transfer Port: 7890
? Fully Qualified Domain Name for this host: c-tso-autoupgrade-01.test.aspicon.lan
? Fully Qualified Domain Name for the Control Center: 192.168.137.16
? Agent Communications Port: 5533
Each Dbvisit StandbyMP Agent and the Dbvisit StandbyMP Control Center must
be configured with the same passphrase. This is how we know that they are all
intended to be part of the same system. Please specify a strong passphrase - we
suggest at least 12 characters, containing at least 2 numbers and 2 symbols.
? Passphrase: ******
? Confirm Passphrase: ******

- - - Dbvisit StandbyMP Agent configuration finished - - -


- - - Ready to perform installation - - -

? Do you wish to proceed with the setup using the supplied configuration options? Proceed with setup

- - - Performing installation - - -

Copying software files to '/usr/local/dbvisit'...
Writing Agent configuration file '/usr/local/dbvisit/standbymp/conf/dbvagentmanager.ini'...

- - - Installation successful! - - -


To enable the installed Dbvisit StandbyMP components to run as system services, you will need to execute some commands as the "root" user in order to complete the setup.

To install the system service(s), you can run, substituting the name of the user to run as if it is different from the current user:
sudo /usr/local/dbvisit/standbymp/bin/dbvagentmanager service install --user oracle
To start the system service(s), you can run:
sudo /usr/local/dbvisit/standbymp/bin/dbvagentmanager service start

- - - Configuration Summary - - -

Install Directory: /usr/local/dbvisit
Fully Qualified Domain Name for this host: c-tso-autoupgrade-01.test.aspicon.lan
Fully Qualified Domain Name for the Control Center: 192.168.137.16
Agent Communications Port: 5533
Agent File Transfer Port: 7890

- - - Installation Summary - - -

The following actions have been performed:
- Installed Dbvisit StandbyMP Agent software into: /usr/local/dbvisit/standbymp
- Agent settings are available in the configuration file: /usr/local/dbvisit/standbymp/conf/dbvagentmanager.ini
- Generated new security certificates in: /usr/local/dbvisit/standbymp/certificates

- - - INSTALLATION SUCCESSFUL - - -
Lobenswert ist weiterhin, dass Dbvisit mit der aktuellen Version nun gleich systemd-Files für die Einbindung in den Bootprozess mitliefert:
[root@c-tso-autoupgrade-01.test.aspicon.lan]$ /usr/local/dbvisit/standbymp/bin/dbvagentmanager service install --user oracle
[root@c-tso-autoupgrade-01.test.aspicon.lan]$ /usr/local/dbvisit/standbymp/bin/dbvagentmanager service start
Man hätte sich an der Stelle auch ein Uninstall-Feature gewünscht. Das ist leider aktuell noch nicht zu finden.
Das neue Controlcenter wird von Dbvisit massiv in den Vordergrund gestellt. Nach seinem Setup und Installation sowie dem Start der Agents kann (und soll) der komplette Betrieb hierüber abgewickelt werden.
Für versierte DBAs ist es jedoch wichtig, dass die Commandlineunterstützung weiterhin erhalten bleibt. Der Mehraufwand für den Betrieb des Controlcenters (Server/VM, ggf. Betriebssystemlizenzen, Installation, Userverwaltung, Sicherung, Patching, Updates, Backup etc.) insbesondere für kleinere Infrastrukturen sollte genau abgewogen werden. Nicht wenige Kunden betreiben lediglich eine überschaubare Anzahl von Standbydatenbanken, benötigen ggf. auch das Multiplatform-Feature nicht. Die Vorteile des Controlcenters werden in diesen Fällen nur schwer vermittelbar sein.
Die Installation des Controlcenters erfolgt ebenso so einfach und schnell wie die der Agents. Ein systemd-Script wird auch für das Controlcenter mitgeliefert.
Achte darauf, dir die vergebene Passphrase gut zu notieren. Es muss für alle Agents und das Controlcenter die gleiche Passphrase verwendet werden, da darüber die Autorisierung erfolgt. Die Passphrase kann jedoch nachträglich bzw regelmäßig mit dem change-passphrase-Tool aus dem $DBVISIT_BASE/bin-Verzeichnis geändert werden.
[aspicon@controlcenter]$./install-control-v11.0.0
+----------------------------------------------------------------------+
|      ____   _                  _ _           __  __ ____             |
|     / ___| | |_ __ _ _ __   __| | |__  _   _|  \/  |  _ \            |
|     \___ \ | __/ _' | '_ \ / _' | '_ \| | | | |\/| | |_) |           |
|       ___) | || (_| | | | | (_| | |_) | |_| | |  | | __ /            |
|     |____/  \__\__,_|_| |_|\__,_|_.__/ \__, |_|  |_|_|               |
|      Copyright 2022                    |___/    By Dbvisit           |
+----------------------------------------------------------------------+

Welcome to Dbvisit StandbyMP setup version v11.0.0.

? Please carefully read the end-user license agreement at https://dbvisit.com/eula. Do you agree to the terms of this agreement? Yes
? Which directory should the software be installed into? /usr/local/dbvisit

- - - You are now configuring the Dbvisit StandbyMP Control Center - - -

The Control Center will listen on the following discovered addresses:
- 127.0.0.1
- 192.168.137.16
? Control Center Web Server Port: 4433
? Agent Communications Port: 5533
Each Dbvisit StandbyMP Agent and the Dbvisit StandbyMP Control Center must
be configured with the same passphrase. This is how we know that they are all
intended to be part of the same system. Please specify a strong passphrase - we
suggest at least 12 characters, containing at least 2 numbers and 2 symbols.
? Passphrase: ******
? Confirm Passphrase: ******

- - - Dbvisit StandbyMP Control Center configuration finished - - -


- - - Ready to perform installation - - -

? Do you wish to proceed with the setup using the supplied configuration options? Proceed with setup

- - - Performing installation - - -

Copying software files to '/usr/local/dbvisit'...
Writing Control Center configuration file '/usr/local/dbvisit/standbymp/conf/dbvcontrol.ini'...

- - - Installation successful! - - -


To enable the installed Dbvisit StandbyMP components to run as system services, you will need to execute some commands as the "root" user in order to complete the setup.

To install the system service(s), you can run, substituting the name of the user to run as if it is different from the current user:
sudo /usr/local/dbvisit/standbymp/bin/dbvcontrol service install --user aspicon
To start the system service(s), you can run:
sudo /usr/local/dbvisit/standbymp/bin/dbvcontrol service start

- - - Configuration Summary - - -

Install Directory: /usr/local/dbvisit
Control Center Web Server Port: 4433
Agent Communications Port: 5533

- - - Installation Summary - - -

The following actions have been performed:
- Installed Dbvisit StandbyMP Control Center software into: /usr/local/dbvisit/standbymp
- Control Center settings are available in the configuration file: /usr/local/dbvisit/standbymp/conf/dbvcontrol.ini
- Generated new security certificates in: /usr/local/dbvisit/standbymp/certificates

- - - INSTALLATION SUCCESSFUL - - -
Auch das Controlcenter bringt geeignete systemd-Startskripts mit:
[root@controlcenter ~]# /usr/local/dbvisit/standbymp/bin/dbvcontrol service install --user aspicon
[root@controlcenter ~]# /usr/local/dbvisit/standbymp/bin/dbvcontrol service start
Unmittelbar nach dem Start des Controlcenters sehen wir bereits auch schon Connections zum vorhin installierten Agent:
[root@controlcenter ~]# netstat -pan|grep "192.168.137.16.*dbvcontrol"
tcp6 0 0 192.168.137.16:5533 192.168.137.171:45570 ESTABLISHED 3039639/dbvcontrol
tcp6 0 0 192.168.137.16:5533 192.168.137.171:45572 ESTABLISHED 3039639/dbvcontrol
Innerhalb der DbvisitMP-Infrastruktur werden folgende drei Netzwerkports verwendet.
Agent Communications Port
Agent File Transfer Port
Control Center Web Server Port
Sowohl Controlcenter als auch Agents können wahlweise im Batch installiert werden. Das kommt besonders einem automatisierten Rollout von Agents sehr entgegen:
[oracle@c-tso-autoupgrade-02]$ ./install-agent-v11.0.0 -batch \
-agent-file-transfer-port 7891 \
-control-center-address 192.168.137.16 \
-install-dir /usr/local/dbvisit \
-passphrase oracle
+----------------------------------------------------------------------+
|      ____   _                  _ _           __  __ ____             |
|     / ___| | |_ __ _ _ __   __| | |__  _   _|  \/  |  _ \            |
|     \___ \ | __/ _' | '_ \ / _' | '_ \| | | | |\/| | |_) |           |
|       ___) | || (_| | | | | (_| | |_) | |_| | |  | | __ /            |
|     |____/  \__\__,_|_| |_|\__,_|_.__/ \__, |_|  |_|_|               |
|      Copyright 2022                    |___/    By Dbvisit           |
+----------------------------------------------------------------------+

Welcome to Dbvisit StandbyMP setup version v11.0.0.

Performing batch install using the following configuration:
-agent-communications-port 5533
-agent-file-transfer-port 7891
-backup-dir /usr/local/dbvisit/standbymp/backup
-batch true
-control-center-address 192.168.137.16
-host-address c-tso-autoupgrade-02.test.aspicon.lan
-install-dir /usr/local/dbvisit
-passphrase oracle


- - - Performing installation - - -

Copying software files to '/usr/local/dbvisit'...
Writing Agent configuration file '/usr/local/dbvisit/standbymp/conf/dbvagentmanager.ini'...

- - - Installation successful! - - -


To enable the installed Dbvisit StandbyMP components to run as system services, you will need to execute some commands as the "root" user in order to complete the setup.

To install the system service(s), you can run, substituting the name of the user to run as if it is different from the current user:
sudo /usr/local/dbvisit/standbymp/bin/dbvagentmanager service install --user oracle
To start the system service(s), you can run:
sudo /usr/local/dbvisit/standbymp/bin/dbvagentmanager service start

- - - Configuration Summary - - -

Install Directory: /usr/local/dbvisit
Fully Qualified Domain Name for this host: c-tso-autoupgrade-02.test.aspicon.lan
Fully Qualified Domain Name for the Control Center: 192.168.137.16
Agent Communications Port: 5533
Agent File Transfer Port: 7891

- - - Installation Summary - - -

The following actions have been performed:
- Installed Dbvisit StandbyMP Agent software into: /usr/local/dbvisit/standbymp
- Agent settings are available in the configuration file: /usr/local/dbvisit/standbymp/conf/dbvagentmanager.ini
- Generated new security certificates in: /usr/local/dbvisit/standbymp/certificates

- - - INSTALLATION SUCCESSFUL - - -
Das Einrichten einer Standbydatenbank „from scratch“ ist nach wie vor ein klarer Pluspunkt gegenüber Oracles DataGuard. Selbst in Oracle 21c ist das Erstellen einer DataGuard Standby noch immer ein manueller Prozess.
Im Controlcenter ist das in wenigen Schritten erledigt:

Im Dashboard erscheint daraufhin die eben angelegte Konfiguration und die Standby-Datenbank kann über den Link „Set up Disaster Recovery now?“ erzeugt werden.

Eine interessante und längst überfällige Erweiterung in Version 11 ist „Shared Space“ ➀ für die Erzeugung der Standbydatenbank. Das von der Primärseite erstellte Backup kann nun auf einem gemeinsamen Share abgelegt und dort direkt von der Standbyseite abgeholt werden. Ähnlich war das unter Verwendung des „Transportable Media“-Konzepts mit einem Share als Medium bereits in den Vorversionen nachbildbar. Dort war aber immer das „Entfernen“ und „Bereitstellen“ manuell zu quittieren. Mit „Shared Space“ ist jetzt endlich ein echtes fire-and-forget implementiert worden. Es wird abgerundet durch die Tatsache, dass das Logshipping und ‑apply mit Abschluss der Standbyerzeugung gleich selbständig starten.
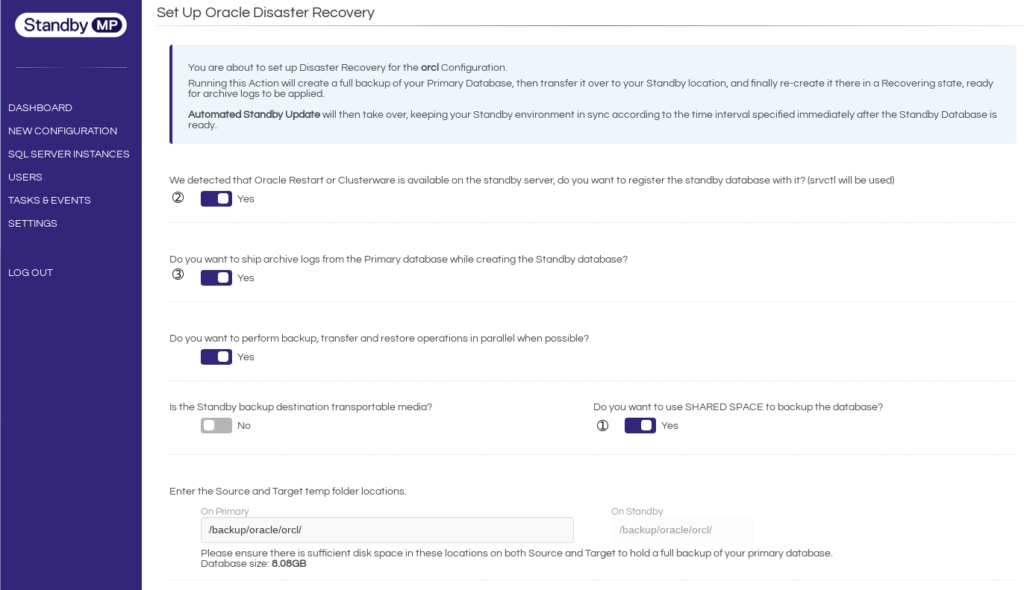
Weitere Highlights an dieser Stelle sind
die Registrierung der Standbydatenbank im Oracle Restart oder der Oracle Clusterware ➁, so dass hierfür gleich der korrekte Autostart beim Serverreboot sichergestellt ist sowie
das Logshipping parallel zum Erstellen der Standbydatenbank ➂. Insbesondere bei großen Datenbanken konnte das Erstellen der Standby so lange dauern, dass Archivelogs vom Zeitpunkt des Kopierbeginns bereits gelöscht wurden, bevor das Kopieren der Datafiles zum Ende kam.
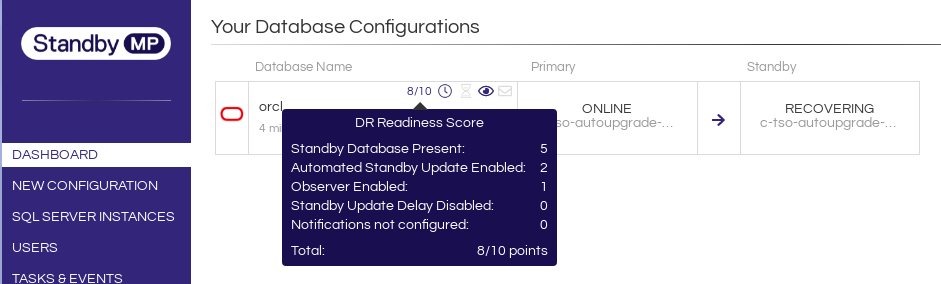
Nach dem Abschluss der Standbygenerierung findet man eine valide und arbeitende Konfiguration vor.

Cooles Gimmick in v11 ist der Desaster Recovery Readiness Score. Über eine gewichtete Bewertung der jeweiligen Konfiguration ist auf einen Blick erkennbar, ob noch Potential für Verbesserung besteht. So könnte man in unserem Beispiel die Qualität der Konfiguration noch durch ein Apply-Delay und das Einrichten einer Benachrichtigungsmethode verbessern:
Installation und Konfiguration der Software sowie das Setup einer Standbydatenbank funktionieren simpel und einwandfrei. Aus der komplett neu gestalteten Prozessarchitektur resultiert eine gewaltige Verbesserung in der Antwortzeit. Die Benutzung des Controlcenter-GUI macht daher wirklich Spaß. Allenfalls die Statusanzeige im Dashboard könnte problembehaftete Konfigurationen etwas klarer kennzeichnen.
Da StandbyMP 11 für den Oracle-Teil noch weitgehend auf der Codebase von Version 10 beruht, sind die bislang bekannten Befehle und Konfigurationsmöglichkeiten weitgehend weiter verfügbar. So war es kein Problem, eine Standbyarchitektur mit Datentransfer via ssh/scp auch in version 11 komplett an der Kommandozeile einzurichten. Bleibt zu hoffen, dass Dbvisit auch beim Redesign des Oraclecodes daran festhält. Für kleine, überschaubare Standbyarchitekturen von vielleicht ein, zwei Oracle-Datenbanken wird das Controlcenter leicht zum Overkill.
Share this article
Sie sehen gerade einen Platzhalterinhalt von YouTube. Um auf den eigentlichen Inhalt zuzugreifen, klicken Sie auf die Schaltfläche unten. Bitte beachten Sie, dass dabei Daten an Drittanbieter weitergegeben werden.
Mehr InformationenSie müssen den Inhalt von reCAPTCHA laden, um das Formular abzuschicken. Bitte beachten Sie, dass dabei Daten mit Drittanbietern ausgetauscht werden.
Mehr InformationenSie sehen gerade einen Platzhalterinhalt von Facebook. Um auf den eigentlichen Inhalt zuzugreifen, klicken Sie auf die Schaltfläche unten. Bitte beachten Sie, dass dabei Daten an Drittanbieter weitergegeben werden.
Mehr Informationen